Monday, July 17, 2017

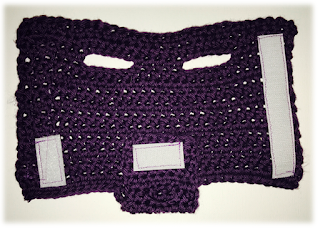
Orphaned Kitten Sweaters-Sizes 1 and 2

***Updated update.  The new patterns are here!  Check them out.***

***Updated to change the last row.***

Welcome to the new and improved version of the size 1 pattern.  There were many helpful tips on the original blog postincluding more detail about the velcro, so go check it out!  Much of this is copied and pasted, but a lot of it is new.

HUGE shoutout to Cheryl Nielson for coming up with the pattern idea for the collar holes and sizing the patterns for a sizes 0 and 2.  A collar can be threaded through the holes around the neck to help keep the babies from wiggling out of the sweater.  The idea Cheryl came up with is WAY cuter than the one I originally tried out.  Thank you, Cheryl!

And this is still Stephanie Noe's baby, so another shoutout to her.  Rarely will you meet someone with so much passion.  Please visit the website to learn more.  http://orphankittensweaters.org/You can also find them on facebook There is always a need for volunteers to make sweaters.  All of the cool kids are doing it!  It will make you feel good!


Materials:  G/4.5mm crochet hook, scissors, yarn needle if desired, SEW-ON Velcro  (Make sure BOTH sides are sew-on.  I learned the hard way.), thread, sewing machine if desired, parchment paper if desired.

Yarn:  100% cotton.  As much as I hate Hobby Lobby, I haven’t found a better cotton yarn in my price range.  It is soft and easy to work with.  I found the Peaches & Creme/Sugar ‘n Cream yarn to be scratchy and stiff.


Stitch Guide:  CH-chain, HDC-half double crochet, SC-single crochet, SL ST-slip stitch

To make the size 2, use the same pattern, but use a 6mm hook.  Some people don't use the flap in this size, as it is usually for post-surgery babies, and the flap isn't necessary.  If this is your preference, just end after row 17.

Pattern:

CH 32

Row 1:
HDC into the 3rd stitch from the end
HDC 1 more
SL ST 2, HDC 2 across for a total of 30 stitches
(This row starts and ends with 2 HDCs.)

Row 2:
CH 2 and turn
HDC 2
CH 2
Skip 2 stitches and repeat across
(This row also starts and ends with 2 HDCs.)

Row 3:
CH 2 and turn
HDC 2
HDC into the back loops of the 2 chains
Repeat across

Row 4-6:
CH2 and turn
HDC 30

Row 7:
CH 2 and turn
HDC 7
CH 6
Skip 6 stitches and HDC 6 into the next stitches
CH 6
Skip 6 stitches and HDC 6 into the remaining 5 stitches

Row 8:
CH 2 and turn
HDC 5
HDC into the back loops of the 6 chains
HDC 6
HDC into the back loops of the 6 chains
HDC 7

Row 9-17:
CH2 and turn
HDC 30

Row 18:
CH 1 and turn
SL ST 11
CH 2
HDC 8

Row 19 & 20:
CH 2 and turn
HDC 8

Row 21:
CH 2 and turn
HDC 2
CH 3
Skip 3 and stitch into the 4th stitch
HDC into the final 3 stitches

Row 22:
CH 2 and turn
HDC 3
HDC into the back loop of the 3 chains
HDC 2

Row 23-25:
CH 2 and turn
HDC 8

Row 26:
CH 2 and turn
HDC 8 together*

CH 1, cut the yarn, pull through, and weave in ends.

*To crochet stitches together, you don’t pull through the last loop.  You’ll chain 2, turn, yarn over, pull through, and then pull through 2.  You’ll have 2 stitches on your hook.  You’ll do that all of the way across, and you’ll end up with 7 stitches on your hook.  Then you’ll yarn over, and pull through all 9 stitches.

Add Velcro.  (Detailed instructions on the original blog.)  Tip:  I've been using thread that matches the yarn.  That way you don't really see it from the outside.  It's been working well.

I actually stopped using the parchment paper and doing the X's on the ends.  I found that doing a backstitch at the beginning and end made it sturdy enough.  It also goes WAY faster.

Helpful images:

Row 1:  HDC into the 3rd stitch.


Row 2:

Row 16:


 Row 19:


The end:


Here are the measurements for the finished project when I do it.  It will vary a little, depending on your tension.

Size 1:


Size 2:
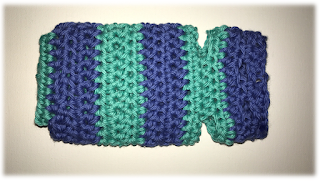
Cheryl did it again!  She came up with more detailed instructions for the velcro!  Thank you, Cheryl!  I still love the stripes.

Please note that the velcro Cheryl uses is wider than what I've been using.  If you have the thinner stuff, use two rows together here.  That way they can adjust as the baby grows.


Some machines do just fine without the parchment paper, but if your yarn gets caught, definitely use the parchment paper.  I get mine in the tin foil/ziploc isle at the grocery store.  It's pretty cheap.


From the top:
Please note that the butt flap goes on the inside.  This makes the sweaters more secure, as well as cuter.  Let's be honest.


From underneath:

Velcro placement:

Step 1:
 Step 2:
 Step 3:

So cute!  Get creative!


Any suggestions are welcome!  Thank you.

Thursday, June 1, 2017

Spaghetti Tacos (I kid you not.)


I can’t even remember how I first heard about these, but now that I have had them, I can't live without them.  I read that the idea was originally a joke from iCarly.  Apparently the older brother was always eating weird food combinations.  Some awesome mom out there decided to actually try it, and the rest is history.

For some reason, I can’t actually find a "recipe" like the one I have used since playing around with it, so I wrote it up for you all.  It’s super easy, so do it!

Ingredients:
1 lb. spaghetti
1 lb. ground turkey (or beef)
1 jar of your favorite red sauce (I use 2, because there's no such thing as too much sauce.)
Garlic salt
Taco seasoning

Taco or tostada shells

Toppings:
Whatever you would use on regular tacos!
Cheese
Olives
Lettuce
Sour cream
Avocado
Tomatoes

Make your spaghetti like you normally would.  Make sure your pasta is al dente to get a better texture.  I season my ground turkey with garlic salt before adding the sauce.  Mix the pasta and sauce together.  (If you are a Food Network addict like I am, you already do this.)

Take out the amount of spaghetti you plan to use for the tacos, and save the rest for tomorrow.  Two meals for the work of one!

To the spaghetti, add taco seasoning to your liking.

Use that spaghetti just like you would taco meat, and go to town.

Tip 1:  I learned from a friend to line the taco shell with the sour cream first.  It helps hold everything in place.  Brilliant!


Tip 2:  Use your egg slicer for the olives.


I didn't use my avocado, because it wasn't quite ripe...and it wouldn't fit on my super cute topping dish.


Normal spaghetti plus taco seasoning.


The perfect side dish for spaghetti tacos is obviously steamed broccoli.  Because, let's face it, there's nothing healthy about spaghetti tacos.


Enjoy!

Wednesday, May 17, 2017

Orphaned Kitten Sweaters

This pattern has been adjusted to add holes for a collar.  Check out the updated pattern here.

Hi.  My name is Mandy, and I am addicted to crochet.

A girl can only use so many hats, scarves, and blankets, so I’m always looking for projects that can keep my hands busy, and at the same time, help others.  I’ve made many hats and scarves for the homeless shelters, and twiddle muffs for dementia patients.  After posting about one of these projects on Facebook, a dear friend of mine suggested crocheting kitten sweaters for orphaned babies.  She is a foster mom for HALO Animal Rescue, so she' knows what she's talking about.


From what I’ve been told, the babies have a hard time regulating their body temperature without their mom.  And, even worse, the babies will try to nurse on certain parts of their brothers, and can actually kill them.  (This is why it’s important that the tail hole be small.)  These sweaters could save kitty lives!  Believe it or not, I haven’t been able to find a pattern out there for such a thing.  The current “sweaters” being used are toddler socks with holes cut for the legs and tail.

Challenge accepted.


We’ve been working on prototypes and trying them out for a few weeks now.  This is the latest version.  We need people to try it out to see if the pattern works.  I’ve never written one before, and don’t actually read patterns normally.  I prefer YouTube videos.  Please help a girl out and give it a shot.  (If someone wants to make a video, I’d be glad to give credit and add it to this blog.)

Once this pattern is found to work, I will adjust it for other sizes.

Materials:  G/4.5mm crochet hook, scissors, yarn needle if desired, SEW-ON Velcro  (Make sure BOTH sides are sew-on.  I learned the hard way.), thread, sewing machine if desired, parchment paper.

Yarn:  100% cotton.  As much as I hate Hobby Lobby, I haven’t found a better cotton yarn in my price range.  It is soft and easy to work with.  I found the Peaches & Creme/Sugar ‘n Cream yarn to be scratchy and stiff.


Stitch Guide:  CH-chain, HDC-half double crochet, SC-single crochet, SL ST-slip stitch

Pattern:

CH 32

Row 1:
HDC into the 3rd stitch from the end
HDC 30 total

Row 2:
CH 2 and turn
HDC 30

Row 3:
CH 2 and turn
HDC 7
CH 6
Skip 6 stitches and HDC 5 into the next stitches
CH 6
Skip 6 stitches and HDC 6 into the rest of the stitches

Row 4:
CH 2 and turn
HDC 6
HDC into the back loops of the 6 chains
HDC 5
HDC into the back loops of the 6 chains
HDC 7

Row 5-13:
CH2 and turn
HDC 30

Row 14:
CH 1 and turn
SL ST 11
CH 2
HDC 8

Row 15 & 16:
CH 2 and turn
HDC 8

Row 17:
CH 2 and turn
HDC 2
CH 3
Skip 3 and stitch into the 4th stitch
HDC into the final 3 stitches

Row 18:
CH 2 and turn
HDC 2
HDC into the back loop of the 3 chains
HDC 3

Row 19-21:
CH 2 and turn
HDC 8
SC, cut the yarn, pull through, and weave in ends.

Add Velcro to hold the tail flap up and close it along the back.  After testing, we found that having the closure on their back makes it easier for them to move.  We tried many, many placements of the velcro.  You can use smaller pieces and make them go the other direction, but make sure you have at least three points to avoid buckling.  I decided that I’d rather use long pieces and have to deal with less starting/stopping with the sewing machine.  I’m far from a sewing expert.  The way I’ve done it here will give maximum room for growth.

The way I did the velcro, I used a 36" long piece of velcro to make 4 sweaters.  I cut the large piece into quarters, cut off about an inch from the quarter, and then cut what was left into 2 pieces.  There aren't exact measurements.  If I were to use a larger piece of velcro, I'd probably go longer, and base it on the size of the actual sweater.  We're still figuring out what's best for the velcro.  As always, your input is very helpful!

TIP:  After much research, I found out that the trick to sewing on yarn is to use parchment paper underneath the project to keep the machine from catching on the yarn.  It rips right off when you’re done.  Also, make sure you backstitch when you start and stop.  This Velcro will be pulled on a lot, so it needs to be reinforced.  I recommend sewing as close to the edge as possible, and sewing an X onto each end to give it more stability.

Thank you, Stephanie, for the inspiration, patience, wisdom, and startup capital.  Your heart is bigger than anyone I know.

Helpful images:

Row 1:  HDC into the 3rd stitch.

Row 3:


Row 4:  

 Row 14:  You can see the SL ST here.


 Row 17:


The end:


Here are the measurements for the finished project when I do it.  It will vary a little, depending on your tension.


Here is the parchment paper under the project before I sewed it.


What it looks like before you tear the paper off.


After removing part of the paper.

With the velcro.  The side with the two rows is the soft side, since some of it might show.  The small piece at the bottom and the single long piece are the scratchy side.

The medium piece is the soft side the smallest piece will attach to.  (This is the inside of the sweater.)

A closer view of the Xs on the Velcro.


From the top.

From underneath.


Velcro placement:
Inside of sweater:

Outside of sweater:

Final step:


Off to a new home:


Any suggestions are welcome!  Thank you.

Friday, January 24, 2014

Crock Pot Sweet Potato and Quinoa Turkey Chili and Cilantro Lime Dressing

I'm going to start off by saying that this chili is freaking awesome.  The night I made it, I was thinking of a few things I would do to improve the recipe, but the second and third day, I realized that it is pretty much perfect just the way it is.  The original blog the recipe came from said that the dish tastes better as leftovers, and they were right!


I'm a fan of any recipe that takes little prep, little clean up, and a lot of flavor.  I, of course, used my Ninja Cooking System instead of a Crock Pot.  I'm in love with my Ninja, and am glad to use it any chance I get.  The original recipe calls for you to cook the turkey on the stove and transfer it to the Crock Pot.  With the Ninja, you don't have to do that.  You cook it right there in the pot.  And, of course, it's the easiest thing in the world to clean.

The first night I made the recipe as is.  I crushed the chips, used the shredded cheese, sour cream, and I put avocados on mine.  It was good, but I thought it needed texture within the chili.  I was thinking that next time I might add a can of kidney beans or garbanzo beans, but I wasn't quite sure.


The second night, I just warmed it up and ate it as was.  It was AMAZING.  I was quite surprised at how much better I liked it.  The third night, I tried it with the toppings again, and ended up eating them all off of the top so I could have the chili by itself again.

What I learned:  Leave it alone.  It doesn't need toppings.

I can't wait to eat it again.  I'm also going to throw some in the freezer to see if it would make a good freezer recipe.

Warning:  The kids didn't like it, but I'm still going to make it again.  Maybe next time they'll change their minds.

Cilantro Lime Dressing
When I found this pin for this recipe, I almost started crying.  I crave Costa Vida salads because of their dressing.  If I could find a copycat recipe, I'd save a lot of money.  This recipe is good, but it wasn't quite there.  I don't know exactly what is different, but I'll figure it out!  Warning:  This recipe makes a lot of dressing.


Tuesday, July 30, 2013

Turn a Box Cake Into a Costco Cake? Please Tell Me It's True.

This blog is a bit late, as I actually tested this pin over three weeks ago.  I’m a slacker.  What can I say?

We have all seen this pin, read its instructions, and felt our pants get instantly tighter.  I know I did, but the possibility of being able to make a cake that tastes like a Costco cake, made it all okay…even though it would be bad.  Very, very bad.


So, here’s what you do.  You add an extra egg, use butter instead of oil and double it, and use milk instead of water.  (Normally I use sugar free applesauce instead of oil, so this was the opposite of what I usually do.)  I tried it on two cakes.  One was devil’s food and the other was strawberry.  I honestly couldn’t tell the difference with the chocolate cake.  It was definitely NOT worth the extra fat and calories.  The strawberry cake, however, was AMAZING.  If Costco made strawberry cake, this could have passed for it.


The one thing I noticed was that the cakes cooked way faster than they normally do.  Keep your eye on it.  This could be why the chocolate one wasn't as amazing.  In a way, I’m kind of glad it didn't blow my socks off…and so are you if you work with me.  If it turned out like a Costco cake, I’d have to make one every weekend, which means I would have to bring the leftovers every Monday.

I used the Martha Stewart cream cheese frosting recipe again.  Love, love, love it.

Monday, July 22, 2013

Toddler Travel Tip-Print the Maps!!!

Before we took our week-long road trip, I looked up pins to get ideas to made the trip easier.  The best tip I came across that I actually tried, was printing the maps for the trip.


We broke the trip into two days each day, so I printed out each day separately.  Each day, I showed the 4 year-old where we were starting, and where we would end.  She randomly throughout the trip would ask me to show her where we were.  I pulled out the Star Wars folder and pen, and circled about where we were.  She absolutely got it.  Giving her a visual to associate time with was brilliant.


Do it.


Friday, July 12, 2013

I Hear It's Called Pink Cloud...I Can Support That

Who doesn't like a dish that is EASY, TASTY, and good for you?  This fits the bill.  Coming in at just 1,472 calories for the entire batch, you really don't even need to share.

I made it as a dessert, but I can see myself making it for breakfast, a side dish, or a snack.  The baby FREAKED out over it.  He wasn't patient enough to let me feed him with an actual utensil, he insisted on using his hands, and was quite vocal about how angry he was when it was gone.  Fortunately, I was nice enough to share mine with him.

I used...

1 tub of light Cool Whip
1 big container of vanilla yogurt
1 box of sugar free cheesecake pudding mix
1 bag of frozen mixed berries

I mixed them all up, and threw it in the fridge last night.  Today, it was amazing.  See:


Oh, my holy crap.  I bet if you threw some granola on top, it would be amazing!

Throw it in a pie crust?!?

Also, next time, I'm trying Greek yogurt.  I'll keep you posted.