***Update-We have changed up the measurements in the images at the bottom to account for what is more consistent with the different yarns and tensions we are all using. Because we all crochet with these different yarns and tensions, we have decided to aim more for the right dimensions, rather than the number of rows and stitches. This is easier said than done for those of you who are not comfortable with crochet, we know that. If you are a beginner, by all means, get used to the pattern before you try to alter it.***
I’m pretty dang proud of how many kitten lives have been touched by this “little” project. Thank you to everyone who has helped in one way or another, especially our fearless leader, Stephanie, and the sweater making machine, Barbara. We are hoping this is the last iteration of the pattern. Fingers crossed! That being said, however, if you have suggestions, please let me know.
I’m pretty dang proud of how many kitten lives have been touched by this “little” project. Thank you to everyone who has helped in one way or another, especially our fearless leader, Stephanie, and the sweater making machine, Barbara. We are hoping this is the last iteration of the pattern. Fingers crossed! That being said, however, if you have suggestions, please let me know.
Hopefully this blog isn’t
too busy, but I’m trying out housing all of the sizes on one page. One day, I’ll figure out how to get it to
jump to the size below without you having to scroll. I'm also hoping to make a how-to video. Stay tuned.
You can find us on facebook, and the official site can be found here. There you can find information on how to volunteer to make these sweaters, how to donate money if you so wish, and about the project itself. Teamwork!


Materials:
G/4.5mm crochet hook, scissors, yarn needle if desired, SEW-ON Velcro (Make
sure BOTH sides are sew-on. I learned the hard way.), thread, sewing
machine if desired, parchment paper if desired.
Yarn: The
original pattern called for 100% cotton yarn, but we have been experimenting
with acrylic recently. Basically whatever
worsted weight yarn you prefer. My
favorite is Caron Simply Soft. With
coupons, I can usually get a skein for under $3. I would suggest that you avoid any of the
super saver-type yarns, as they aren’t very soft. Think about what you would want a human baby
wrapped up in. I found that the Lion
Brand 24/7 cotton and Caron Cotton Cakes work well for the size 2
sweaters. That size isn’t used so much
to keep babies warm, but more for protecting their stitches post-surgery. It allows the wound to breathe, but keeps the
poor little babies from needing to wear the “cone of shame.”
Guide to sizes:
The Millie: approximately 3-10 oz.
The Mazie: approximately 10-18 oz.
The Daniel: approximately 18-26 oz.
The Sunny: approximately 26-32 oz.
Stitch Guide:
CH-chain, HDC-half double crochet, SC-single crochet, SL ST-slip stitch


Row 1:
SC into
the 2rd stitch from the end
SC 1
more
SL ST into the next 2 stitches, SC into the next 2 stitches. Continue across for a total of 22 stitches.
(This row starts and ends with 2 SCs.)
SL ST into the next 2 stitches, SC into the next 2 stitches. Continue across for a total of 22 stitches.
(This row starts and ends with 2 SCs.)
Row 2:
CH 1 and turn
SC 2
CH 2
Skip 2 stitches and repeat across
(This row also starts and ends with 2 SCs.)
Row 3:
CH 2 and turn
HDC 2
HDC into the back loops of the 2 chains
Repeat across
Row 4:
SC 2
CH 2
Skip 2 stitches and repeat across
(This row also starts and ends with 2 SCs.)
Row 3:
CH 2 and turn
HDC 2
HDC into the back loops of the 2 chains
Repeat across
Row 4:
CH1 and
turn
SC 22
Row 5:
CH 2 and turn
CH 2 and turn
HDC into first 4 stitches
CH 4
Skip 4
stitches and HDC 4 into the next 4 stitches
CH 4
Skip 4
stitches and HDC 6 into the remaining 6 stitches
Row 6:
CH 2
and turn
HDC 6
HDC
into the back loops of the 4 chains
HDC 4
HDC
into the back loops of the 4 chains
HDC 4
Row 7-9:
CH2 and
turn
HDC 22
Row 10:
CH 1
and turn
SL ST 10
CH 2
HDC 6
Row 11:
CH 2
and turn
HDC 6
Row 12:
CH 2
and turn
HDC 1
CH 3
Skip 3
and stitch into the 4th stitch
HDC
into the final stitch
Row 13:
CH 2
and turn
HDC 2
HDC
into the back loop of the 3 chains
HDC 2
Row 14:
CH 2
and turn
HDC 6
Row 15:
CH 2 and turn
HDC 6 together*
CH 1, cut the yarn, pull through, and weave in ends.
*To crochet
stitches together, you don’t pull through the last loop. You’ll
chain 2, turn, yarn over, pull through, and then pull through 2. You’ll
have 2 stitches on your hook. You’ll do that all of the way across,
and you’ll end up with 7 stitches on your hook. Then you’ll yarn
over, and pull through all 7 stitches.


CH 28
Row 1:
HDC
into the 3rd stitch from the end
HDC 1
more
SL ST 2, HDC 2 across for a total of 26 stitches
(This row starts and ends with 2 HDCs.)
SL ST 2, HDC 2 across for a total of 26 stitches
(This row starts and ends with 2 HDCs.)
Row 2:
CH 2
and turn
HDC 2
CH 2
Skip 2 stitches and repeat across
(This row also starts and ends with 2 HDCs.)
Row 3:
CH 2 and turn
HDC 2
HDC into the back loops of the 2 chains
Repeat across
Row 4-5:
HDC 2
CH 2
Skip 2 stitches and repeat across
(This row also starts and ends with 2 HDCs.)
Row 3:
CH 2 and turn
HDC 2
HDC into the back loops of the 2 chains
Repeat across
Row 4-5:
CH2 and
turn
HDC 26
Row 6:
CH 2 and turn
CH 2 and turn
HDC 5
CH 5
Skip 5
stitches and HDC 5 into the next stitches
CH 5
Skip 5 stitches and HDC 6 into the remaining 6 stitches
Row 7:
CH 2
and turn
HDC 6
HDC
into the back loops of the 5 chains
HDC 5
HDC
into the back loops of the 5 chains
HDC 5
Row
8-12:
CH2 and
turn
HDC 26
Row 13:
CH 1
and turn
SL ST 11
CH 2
HDC 6
Row 14:
CH 2
and turn
HDC 6
Row 15:
CH 2
and turn
HDC 1
CH 3
Skip 3
and stitch into the 4th stitch
HDC
into the final 2 stitches
Row 16:
CH 2
and turn
HDC 2
HDC
into the back loop of the 3 chains
HDC 1
Row
17-19:
CH 2
and turn
HDC 6
Row 20:
CH 2
and turn
HDC 6 together*
HDC 6 together*
CH 1, cut the yarn, pull through, and weave in ends.
*To
crochet stitches together, you don’t pull through the last loop. You’ll
chain 2, turn, yarn over, pull through, and then pull through 2. You’ll
have 2 stitches on your hook. You’ll do that all of the way across,
and you’ll end up with 7 stitches on your hook. Then you’ll yarn
over, and pull through all 7 stitches.


Pattern:
CH 32
Row 1:
HDC into the 3rd stitch
from the end
HDC 1 more
SL ST 2, HDC 2 across for a total
of 30 stitches
(This row starts and ends with 2
HDCs.)
Row 2:
CH 2 and turn
HDC 2
CH 2
Skip 2 stitches and repeat
across
(This row also starts and ends
with 2 HDCs.)
Row 3:
CH 2 and turn
HDC 2
HDC into the back loops of the 2
chains
Repeat across
Row 4-6:
CH2 and turn
HDC 30
Row 7:
CH 2 and turn
HDC 7
CH 6
Skip 6 stitches and HDC 6 into
the next stitches
CH 6
Skip 6 stitches and HDC 5 into
the remaining 5 stitches
Row 8:
CH 2 and turn
HDC 5
HDC into the back loops of the 6
chains
HDC 6
HDC into the back loops of the 6
chains
HDC 7
Row 9-17:
CH2 and turn
HDC 30
Row 18:
CH 1 and turn
SL ST 11
CH 2
HDC 8
Row 19 & 20:
CH 2 and turn
HDC 8
Row 21:
CH 2 and turn
HDC 2
CH 3
Skip 3 and stitch into the 4th stitch
HDC into the final 3 stitches
Row 22:
CH 2 and turn
HDC 3
HDC into the back loop of the 3
chains
HDC 2
Row 23-25:
CH 2 and turn
HDC 8
Row 26:
CH 2 and turn
HDC 8 together*
HDC 8 together*
CH 1, cut the yarn, pull through, and weave in ends.


To make The Sunny, use the same pattern as The Daniel, but use a 6mm hook. Most people don't want the flap in this size, as it is usually for post-surgery babies, and it isn't necessary. If this is your preference, just end after row 17.

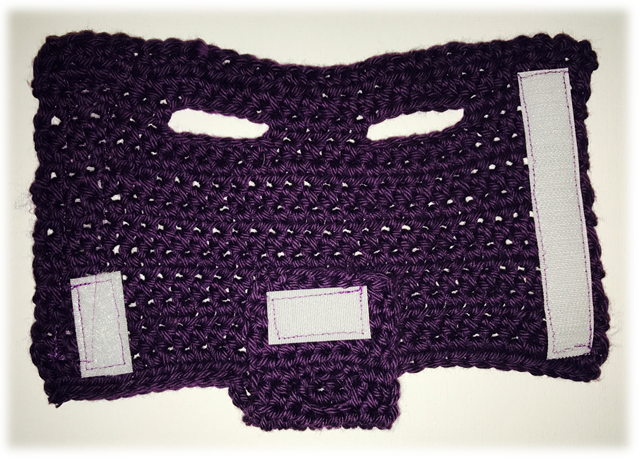
Add Velcro. Tip: I've been using thread that matches the yarn.
That way you don't really see it from the outside. It's been
working well.
I actually stopped using the parchment paper and doing the X's on the ends. I found that doing a backstitch at the beginning and end made it sturdy enough. It also goes WAY faster. If you have an issue with the yarn catching in your machine, use parchment paper underneath your piece.
Helpful images:

Row 1:


To add the arm holes, you'll do your chain stitches, yarn over, and stitch into whatever stitch it calls for in the pattern.

When you chain together, you'll pull through the two loops that are circled here:

The stitches on your hook before you yarn over and pull through all of the loops.

Measurements: Please keep in mind that these are estimates. Your sweaters may vary, due to tension or yearn differences.
The Millie:


The Daniel:

The Sunny:

Velcro:
In this picture, the scratchy velcro is the larger piece on the left, and the small piece on the right is the soft side.

In this picture, the larger section is the soft side, and the small piece on the flap is the scratchy side. The two smaller models have one row of the soft velcro, and the two larger models have two rows.