
*Updated Update-The new patterns are here! Check them out.***
***Updated to add the smaller size and change the last row. We have rounded the end, so it looks better when the flap is used on the outside.***
Welcome to cutest, and most important versions of our adorable kitten sweaters. These are the guys who need these the most. There were many helpful tips on the original blog post, including more detail about the velcro, so go check it out! There is also a size 1 and 2 on this post. Much of this is copied and pasted, but a lot of it is new.
Another HUGE shoutout to Cheryl for coming up with the pattern idea for the collar holes and sizing the patterns for a sizes 0 and 2. A collar can be threaded through the holes around the neck to help keep the babies from wiggling out of the sweater. The idea Cheryl came up with is WAY cuter than the one I originally tried out. Thank you, Cheryl!
And this is still Stephanie's baby, so another shoutout to her. Rarely will you meet someone with so much passion. Please visit the website to learn more. http://orphankittensweaters.org/. You can also find them on facebook. There is always a need for volunteers to make sweaters. All of the cool kids are doing it! It will make you feel good!
Yarn: 100% cotton. As much as I hate Hobby Lobby, I haven’t found a better cotton yarn in my price range. It is soft and easy to work with. I found the Peaches & Creme/Sugar ‘n Cream yarn to be scratchy and stiff.


Stitch Guide: CH-chain, HDC-half double crochet, SC-single crochet, SL ST-slip stitch
Size -1:
CH 27
Row 1:
SC into the 2rd stitch from the end
SC 1 more
SL ST 2, SC 2 across for a total of 26 stitches
(This row starts and ends with 2 SCs.)
SL ST 2, SC 2 across for a total of 26 stitches
(This row starts and ends with 2 SCs.)
Row 2:
CH 2 and turn
SC 2
CH 2
Skip 2 stitches and repeat across
(This row also starts and ends with 2 SCs.)
Row 3:
CH 2 and turn
HDC 2
HDC into the back loops of the 2 chains
Repeat across
Row 4:
SC 2
CH 2
Skip 2 stitches and repeat across
(This row also starts and ends with 2 SCs.)
Row 3:
CH 2 and turn
HDC 2
HDC into the back loops of the 2 chains
Repeat across
Row 4:
CH2 and turn
SC 22
Row 5:
CH 2 and turn
CH 2 and turn
HDC 8
CH 4
Skip 4 stitches and HDC 4 into the next stitches
CH 4
Skip 4 stitches and HDC 5 into the remaining 6 stitches
Row 6:
CH 2 and turn
HDC 6
HDC into the back loops of the 4 chains
HDC 4
HDC into the back loops of the 4 chains
HDC 8
Row 7-9:
CH2 and turn
HDC 26
Row 10:
CH 1 and turn
SL ST 10
CH 2
HDC 6
Row 11:
CH 2 and turn
HDC 6
Row 12:
CH 2 and turn
HDC 1
CH 3
Skip 3 and stitch into the 4th stitch
HDC into the final stitch
Row 13:
CH 2 and turn
HDC 2
HDC into the back loop of the 3 chains
HDC 2
Row 14:
CH 2 and turn
HDC 6
Row 15:
CH 2 and turn
HDC 6 together*
CH 1, cut the yarn, pull through, and weave in ends.
Size 0:
CH 28
Row 1:
HDC into the 3rd stitch from the end
HDC 1 more
SL ST 2, HDC 2 across for a total of 26 stitches
(This row starts and ends with 2 HDCs.)
SL ST 2, HDC 2 across for a total of 26 stitches
(This row starts and ends with 2 HDCs.)
Row 2:
CH 2 and turn
HDC 2
CH 2
Skip 2 stitches and repeat across
(This row also starts and ends with 2 HDCs.)
Row 3:
CH 2 and turn
HDC 2
HDC into the back loops of the 2 chains
Repeat across
Row 4-5:
HDC 2
CH 2
Skip 2 stitches and repeat across
(This row also starts and ends with 2 HDCs.)
Row 3:
CH 2 and turn
HDC 2
HDC into the back loops of the 2 chains
Repeat across
Row 4-5:
CH2 and turn
HDC 26
Row 6:
CH 2 and turn
CH 2 and turn
HDC 5
CH 5
Skip 5 stitches and HDC 5 into the next stitches
CH 5
Skip 5 stitches and HDC 6 into the remaining 6 stitches
Row 7:
CH 2 and turn
HDC 6
HDC into the back loops of the 5 chains
HDC 5
HDC into the back loops of the 5 chains
HDC 5
Row 8-12:
CH2 and turn
HDC 26
Row 13:
CH 1 and turn
SL ST 11
CH 2
HDC 6
Row 14:
CH 2 and turn
HDC 6
Row 15:
CH 2 and turn
HDC 1
CH 3
Skip 3 and stitch into the 4th stitch
HDC into the final 2 stitches
Row 16:
CH 2 and turn
HDC 2
HDC into the back loop of the 3 chains
HDC 1
Row 17-19:
CH 2 and turn
HDC 6
Row 20:
CH 2 and turn
HDC 6 together*
HDC 6 together*
CH 1, cut the yarn, pull through, and weave in ends.
________________________________________________________________________
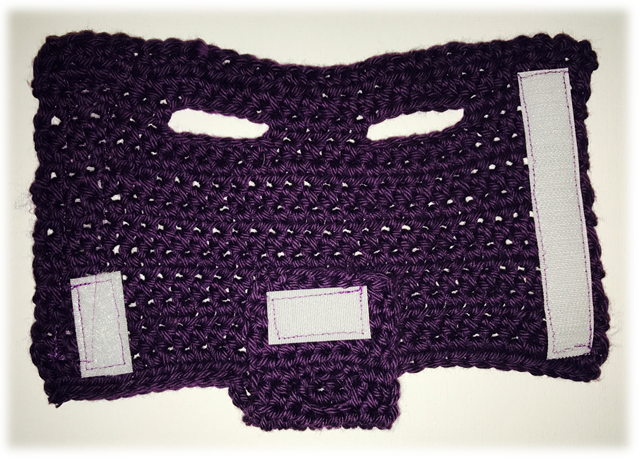
Add Velcro. (Detailed instructions on the original blog.) Tip: I've been using thread that matches the yarn. That way you don't really see it from the outside. It's been working well.
Add Velcro. (Detailed instructions on the original blog.) Tip: I've been using thread that matches the yarn. That way you don't really see it from the outside. It's been working well.
I actually stopped using the parchment paper and doing the X's on the ends. I found that doing a backstitch at the beginning and end made it sturdy enough. It also goes WAY faster.
Helpful images:
Row 1: HDC into the 3rd stitch.


Row 2:


Here are the measurements for the finished project when I do it. It will vary a little, depending on your tension.

Cheryl did it again! She came up with more detailed instructions for the velcro! Thank you, Cheryl! I love the stripes.

Some machines do just fine without the parchment paper, but if your yarn gets caught, definitely use the parchment paper. I get mine in the tin foil/ziploc isle at the grocery store. It's pretty cheap.


This is the part that will go on the inside of the finished sweater.


Some machines do just fine without the parchment paper, but if your yarn gets caught, definitely use the parchment paper. I get mine in the tin foil/ziploc isle at the grocery store. It's pretty cheap.


This is the part that will go on the inside of the finished sweater.

From the top:
Please note that the butt flap goes on the inside. This makes the sweaters more secure, as well as cuter. Let's be honest.


Velcro placement:


Step 1:


So cute! Get creative!


Any suggestions are welcome! Thank you.
No comments:
Post a Comment